Usage Guide
This comprehensive guide walks you through using Kryvea for managing security assessments.
Table of Contents
- Getting Started
- User Roles
- Workflow Overview
- Customer Management
- Assessment Management
- Vulnerability Management
- Category Management
- Report Generation
- Import & Export
- Keyboard Shortcuts
Getting Started
First Login
- Navigate to
https://localhost(or your configured domain) - Enter default credentials:
- Username:
kryvea - Password:
kryveapassword
- Username:
- When prompted, enter a new password that meets the following requirements:
- At least 10 characters long
- Includes at least one uppercase letter
- Includes at least one lowercase letter
- Includes at least one special symbol
User Roles
Kryvea has two user roles:
Admin
- Full access to all features
- Customer management (create, edit, delete)
- User management
- Category management
- Global template management
- System settings and logs
User
- Assessment management
- Vulnerability tracking
- Report generation
- Limited to assigned customers
- Cannot manage users or global settings
Workflow Overview
The typical Kryvea workflow:
Normal workflow
- Create Customer
- Create Assessment
- Add Vulnerabilities (Manual or Import)
- Assign Categories & CVSS Scores
- Add PoC
- Generate report (DOCX/XLSX)
Customer Management
Creating a Customer
Admin only
- Navigate to Customers -> New Customer
- Fill in customer details:
- Company Name: Customer organization name
- Language: Default language that will be preselected in new assessment
- Logo: Upload customer logo (PNG, JPG) (Optional)
Uploading Custom Templates
- Go to Edit Customer page
- Insert a template name
- Insert a type to help you to identify better the template (Optional)
- Select a DOCX/XLSX template file
- Click Upload
Managing Customers
View all customers:
- Navigate to Customers
- Search by name
- Click on a customer to view assessments associated
Edit customer:
- Customer Detail -> Edit
- Update name, language, or logo
- Save changes
Delete customer:
- Customer Detail -> Delete
- ⚠️ Warning: This will delete all associated assessments, targets and vulnerabilities
Assessment Management
Creating an Assessment

Navigate to Customer Detail -> Assessments -> New Assessment
Fill in assessment information:
Basic Information:
- Name: Assessment name
- Assessment Type: Select assessment type (e.g., Web Application Penetration Test, Network Penetration Test, etc)
- Language: Select assessment language
Timeline:
- Start Date: Testing begins
- End Date: Testing completes
- Kickoff Date: Project start
Targets:
- Add target systems/applications
- Each target can have vulnerabilities associated
Configuration:
- CVSS Versions: Select which CVSS versions to use (v3.1, v4.0c)
- Environment: Production | Pre-Production | Testing (Optional)
- Testing Type: Black box | Grey box | White box (Optional)
- OSSTMM Vector: OSSTMM classification (Optional)
Managing Assessments
View assessments:
- Customer name -> Assessments tab
TIP
Take ownership ⭐: Once you take ownership of the assessment, it will become accessible on the Dashboard page.
Edit assessment:
- Assessment -> Edit
- Update any field
- Save changes
Clone assessment:
- Assessment -> Clone
- Optionally include PoCs
- Creates duplicate with all vulnerabilities
Delete assessment:
- Assessment -> Delete
- ⚠️ Warning: Deletes all associated vulnerabilities
Assessment Status Workflow
On Hold -> In Progress -> CompletedUpdate status from the assessments page.
Vulnerability Management
Adding Vulnerabilities Manually

Navigate to Assessment -> Vulnerabilities -> New Vulnerability
Select a Category (e.g., "SQL Injection", "XSS")
- Generic description auto-populated from categories
- Ticking the "Show categories from all sources" checkbox will include categories created during automatic scans (e.g. Nessus, Burp) among the selectable categories
- Ticking the "Generic remediation" checkbox will add the remediation included in the category; leaving this box unticked will prevent it from being included
Fill in details:
- Detailed Title: Specific vulnerability name (Optional)
- Status: Open | Fixed | Partially Fixed
- Target: Affected target
CVSS Scoring:
- Select CVSS version (based on assessment config)
- Use the calculator or enter vector string
- Score auto-calculated
Description & Remediation:
- Write details to specifically describe the identified vulnerability
- If necessary, include a more specific remediation
References:
- Add URLs, CVE IDs, etc. (One per line)
CVSS Calculator
The built-in CVSS calculator supports:
- CVSS v3.1: Base, Temporal, Environmental
- CVSS v4: Base, Supplemental, Environmental, Threat metrics
Usage:
- Select CVSS version
- Choose values for each metric
- Vector string and score auto-generate
- Severity level displayed (None, Low, Medium, High, Critical)
Adding Proof of Concept (PoC)
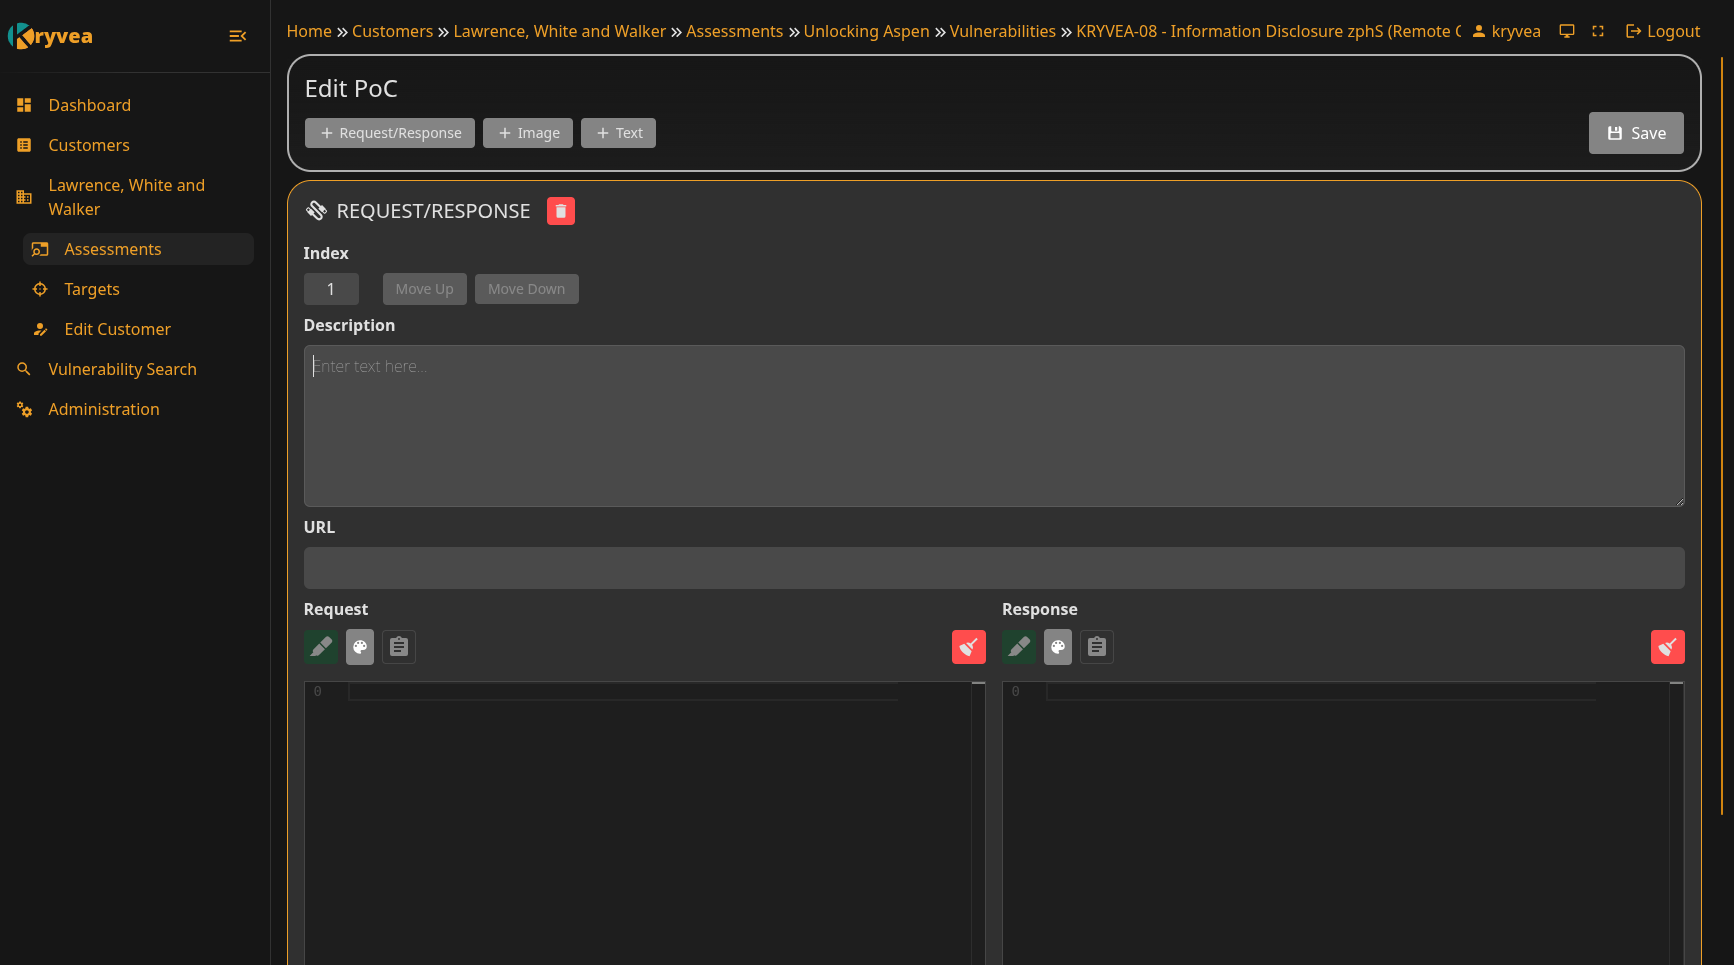
- Navigate to Vulnerability Detail -> Edit PoC tab
- Use the header bar to add:
- HTTP Request/Response
- Image
- Text
- Add highlighting to Request/Response and Text to highlight specific snippets
- Click Save
Searching Vulnerabilities

Global search:
- Navigate to Vulnerability Search
- Search across all assessments
- Filter by:
- Assessment
- User
- Date range
- Customer
- CVSS Versions
- CVSS score range
Copying Vulnerabilities
Copy vulnerabilities between assessments:
- Find vulnerability in search
- Click Copy to
- Select destination:
- Customer
- Assessment
- Target
- Optionally include PoC
- Click Copy
Category Management
Admin only
Categories define vulnerability types using generic descriptions and remediation guidance, with support for multiple languages.
Browsing Categories
- Navigate to Categories
- View all available categories
- It can be preloaded with some items from the OWASP Top 10, which can be found here
Creating a Category
Categories -> New Category
Fill in details:
- Identifier: Short code (e.g., "A01:2021")
- Name: Vulnerability type (e.g., "SQL Injection")
- Source:
- OWASP Top 10 Web
- OWASP Top 10 Mobile
- OWASP Top 10 API
- OWASP Top 10 for LLM
- ATT&CK
- Burp
- CWE
- Nessus
- References: Links to CWE, OWASP, etc.
Generic Description and Generic Remediation (multilingual), it is set by default to the language selected in the
Settings, but any language can be added.
Importing Categories
- Categories -> Import
- Select JSON file with category definitions (e.g.,
app/data/generic_categories.json) - Choose import mode:
- Add new only: Skip existing
- Override: Update existing categories
- Click Import
Exporting Categories
- Categories -> Export
- Downloads JSON file with all categories
- Share with team or backup
Report Generation
Generating DOCX Reports
- Navigate to Assessment Detail
- Click Export -> DOCX
- Select template:
- Global template
- Customer-specific template
- Configure options:
- Include informational findings
- Click Generate
- Download Word document
Generating XLSX Reports
- Navigate to Assessment Detail
- Click Export -> XLSX
- Select template:
- Global template
- Customer-specific template
- Configure options:
- Include informational findings
- Click Generate
- Download Excel document
Generating XLSX Reports with images with ZIP
- Navigate to Assessment Detail
- Click Export -> ZIP
- Configure options:
- Include informational findings
- Click Generate
- Download zip archive that contains a xlsx file and a folder with images
Import & Export
Importing from Burp Suite
In Burp Suite:
- Scanner -> Right-click -> Save selected issues
- Choose XML format
In Kryvea:
- Assessment -> Import -> Burp Suite
- Upload XML file
- Map to targets
- Vulnerabilities auto-created with CVSS scores
Importing from Nessus
In Nessus:
- Export scan results
- Choose Nessus format (.nessus)
In Kryvea:
- Assessment -> Import -> Nessus
- Upload .nessus file
- Map plugins to categories
- Vulnerabilities auto-created
Category Import/Export
Export:
- Categories -> Export
- Save JSON file
Import:
- Categories -> Import
- Upload JSON file
- Choose override option
Keyboard Shortcuts
Edit PoC
- In MonacoEditor you have all the VS Code shortcuts
Ctrl/Cmd + V: Paste image in PoC image type
Next Steps
- Templating Guide - Create custom report templates
- Troubleshooting - Common issues